News
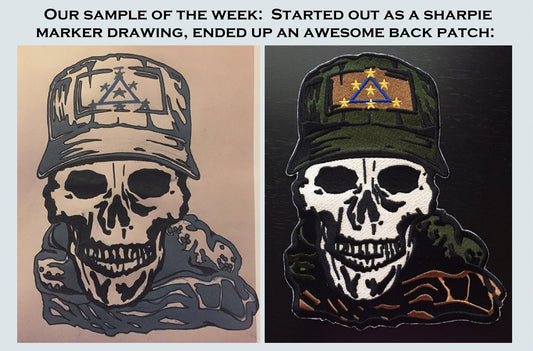
How a drawing becomes a patch! March 9, 2022 18:03
Funny, I feel like I'm writing for one of those kid science shows that illustrates how one thing becomes something else. Well, We will definitely have a full video that goes through all the steps, but for now, this is a drawing submitted by one of our great customers, Wayne. He submitted this drawing with specific measurements.
One of the best things about Wayne is, he's very helpful. He knows what he wants and doesn't hesitate to tell us. Exact measurements, exact colors, exact style. Knowing exactly what you, as a customer, wants, is essential since we are custom and only make exactly what you want. Only you know how you want something to look and the more info you give us, the better and easier it is to meet your expectations.
One more thing for you to think about. If you need artwork or an illustration to for your idea, you can find someone on fiver.com to create one. We don't have artists on hand and as embroiderers, we only manually trace the artwork that is given to us. Unless it's text, we don't have the ability to add extra details to your design.
Enjoy the video and keep coming back for more!
8 Tips For Customers When Ordering Custom Embroidery September 23, 2019 13:09 26 Comments
Custom items aren't the easiest to order. The process requires a lot of patience from both parties, the customer and the embroiderer.
Sometimes you, as the customer, have something in your head that you can't quite describe or even draw. Believe me when I tell you all we want to do is be able to get you exactly what you need. So, here are some tips for a smooth ordering when it comes to custom embroidered patches, caps, biker patches and custom shop shirts.
1-Think of everything in terms of stitches: When you have a particular image in mind for custom embroidery, remember most of the image will be stitches (the rest will be fabric). So, there is a lot of overlapping involved to avoid gaps in the embroidery. For example, look at the pic below. The orange line is supposed to border the white, so it has to be overlapped properly with plenty of stitches to avoid the gap you see in part of the border. More than 3 overlaps of thread makes for messy embroidery. It also stiffens that area of the garment or patch. Be sure to keep that in mine when choosing your custom image.
2-Small Text: Text less than 1/4" of an inch may be hard to read. Especially, if it's a funky text. What I mean by "funky" is, anything that isn't regular block text. Because of a high amount of concentration of stitches in one area, very tiny text may be hard to read. Sure, you may get the gist of it, but if clear, legible text is what you're looking for and you want to keep your embroidery crisp or clean, you may want to stack your text or eliminate it all together. Also, borders around small text may become unaligned. Again, that has to do with the concentration of stitches and the small text. Structured caps are the hardest to embroider with tiny text, especially with an outline.
3-Fades and Color Transitions: Color transitions always look good digitally and on printed items because the ink can blend easily. But please keep in mind, thread is solid and so even though we can blend colors to a certain degree,especially on larger embroidery, color blends may not look so pretty on smaller logos on items such as caps. Again, that has a lot to do with the concentration of stitches and also, structured caps are thick. So, adding a lot of stitches in one area will make it look messy and unprofessional.
4-Lots of Detail Takes Time to Digitize: A digitizer is the artist that manually recreates your artwork and turns it into stitches. If your image has a lot of detail, please keep in mind it may take more than normal to get it right. Plus, they have to sew it out to ensure everything looks appropriate. If your artwork has a lot of detail, your set up fee may cost more because it requires a lot of more time to digitize.
5-Drawings: If you're a good pencil sketch artist and want it turned into a biker patch, it's best to already know whether you want the embroidery to reflect your sketch and stay in a gray scale or if you want it to be filled in with colors. The pic directly below is a sample of a sketched skull. The artist wanted a custom back patch to reflect the colors of his sketch.
Below is a drawing in which the artist wanted to add color to his embroidered patch. so he detailed what colors would go where. It's also best to already know the approximate size you need the patch to be when requesting a quote.
6-Knowing When You Require a Graphic Artist: It's always best to submit the exact artwork you want duplicated into a custom patch or embroidered logo. Often, you may have an image you like, but want adjusted. Let's say it's a sihoulette of a man holding up a barbell...only, you don't want him holding a barbell, you want his arm at at his side, holding a towel. You will need to find a graphic artist and have him graphically create the exact image you want and then submit it to us as the exact image you want changed into embroidery. It's easy to find great graphic artists and reasonable prices. You can do so on fiverr.com or craigslist.com.
7-Give Yourself Plenty of Time: I have yet to experience a customer who didn't care about quality. So, give yourself plenty of time when ordering custom items. The process takes time. For instance, custom biker patches can take up to 2 weeks to get everything right. Especially, if we hit some bumps in the road. They need to be digitized, approved, embroidered and then trimmed, laser cut and heat sealed. This set, along with thousands of other patches. If there is a date you need your custom items in hand, please always be sure to let us know when requesting a quote.
8-Certain Items Have Size Limitations: Keep in mind, there are size limitations on caps, over the pocket of a shirt, on the sleeve, etc. The smaller you go on an item, the more detail you sacrifice. If there is something we think may not look appropriate, we will let you know before hand. We can also work with you to eliminate part of the design that won't change the integrity of the logo or artwork.
Iron On Patches vs Sew On Patches July 23, 2019 15:32 36 Comments
We witness a lot of indecisiveness when it comes to iron on patches and sew on patches. We are here to tell you, there isn't much of a difference. However, we want to explain both so you can make the right decision when it comes to your current project.
First, we want to clear up the confusion and I'm pretty sure I know where it comes from. Patches that contain heat seal or iron on backing appear as if there is only one way to attach them.
Iron on patches contain a thin film (see above) of commercial grade heat seal backing. Guess what, folks? These can also be sewn on. There is no need to iron these on and then sew them on. If you don't want glue on your jacket, backpack, etc, then just sew these bad boys on and forget about the iron all together. The heat seal backing is flexible enough for needle penetration. In my opinion, having it on there makes the patch last longer because not only is the back side of the embroidery knotted, but then the knots are also heat sealed. So, unraveling is virtually impossible.
There is also a confusion about whether or not the heat seal backing is plastic. Our company does not use plastic backing. Usually, that is there to make the patch very stiff and cannot be ironed on. WIth our heat seal, the patch becomes a bit sturdier...and when I say sturdy, I mean it adds a little bit of stiffness to the patch.
Sew on patches are great too. They add more flexibility to the garment on which the patch is attached. So, if you don't want your patch to be a little stiff, you can have the iron on backing eliminated and once it's sewn on, the patch can flow a bit with the fabric.
Choosing whether to purchase iron on patches or sew on patches is really just about what you prefer or the look you're going for. However, the iron on patch really gives you the best options...you can sew it on or iron it on. The best of both worlds.
I also wanted to add something to this as a final thought and great point from one of our awesome customers, Dori. "Having used your name patches for well over 5 years , the sewing method has worked the best as they have been removed and sewn again and again! Love your patches!!".
What a glowing recommendation from Dori and an excellent point about sewing patches on so they can be transferred and resused!
If you want to move the patch from jacket to jacket and for it to not be permanantly attached to one garment, then sewing it on works best. You can unstitch it and stitch it on to something else. Just remember to NOT iron it on first.